Differential Equations and Slope Fields
Objective
Differential equations express the rate at which a function grows. If your town's population grows by 10% a year, you could express this by the differential equation dP/dt = 0.10P (where P is population and t is time in years). Each differential equation describes an entire family of related functions: a small rural village with only a few dozen inhabitants and a sprawling urban metropolis might each experience 10% growth, but of course their actual populations—and the functions that will describe them—will be different.
In this activity, you'll investigate the family of functions described by a single differential equation by constructing the differential equation's slope field. This field—a picture—suggests the slope or direction of functions described by a common differential equation at every point on the plane. You can use slope fields to find particular solutions to differential equations graphically.
Choosing a Differential Equation
In this activity and the next activity, you'll work with a single differential equation. The choice of equation is up to you—you might want to choose one from the list below, or make up your own. In either event, be sure to indicate the differential equation you've chosen by circling it below or writing it at the top of your assignment sheet.
• dy/dx = 2x • dy/dx = 3y2
• dy/dx = 3(x/y) • dy/dx = 0.5x + y
• dy/dx = 2x(1 - x) • dy/dx = ______________________
(If you choose your own equation, avoid constant expressions such as dy/dx = 3. While these are certainly valid differential equations, they aren't very interesting to graph!)
Part I: Graphing the Slope at a Point
Step 1: Choose a differential equation from the list above for exploration during this activity.
Step 2: Open a new sketch and place a point anywhere in it. Use the text tool to label the point P. Because this point can be freely dragged, it represents any—or every—point on the plane.
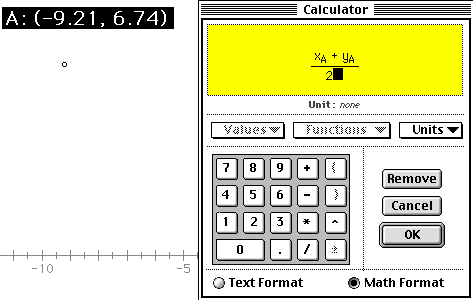
Step 3: Measure the coordinates of P.
Step 4: Use the calculator to evaluate the right-hand side of the differential equation in terms of the measured coordinates XA and YA.
Here's a step-by-step example for the differential equation dy/dx = (x + y)/2:
- Choose Calculate from the Measure menu.
- Use the on-screen keypad or the keyboard to enter an open parenthesis.
- With the mouse, press on the measured coordinates of P that are visible in the sketch behind the calculator. A pop-up menu will offer you choices of X or Y. Choose X.
- From the keypad, enter the addition symbol.
- Return to the coordinate's pop-up menu and choose Y.
- Complete the calculation by using the keypad to enter a close parenthesis, the division symbol, and 2. Then click OK.
The result of your calculation represents the slope of a function described by your differential equation as it passes through point P.
Step 5: Choose the Text tool from the toolbox, and double-click your calculated value. In the dialog box that appears, rename your calculation to "dy/dx."
Step 6: Construct a line passing through point P with the slope dy/dx that you just calculated.
There are many ways you could construct such a line. Here's one, which first determines the angle of the line based on its slope, and then uses this angle to find a second point on the line:
- Use the Calculator and its Functions sub-menu to calculate ArcTan[dy/dx], which is the angle of the line whose slope (dy/dx) you've just calculated.
- Select your initial point P and choose Translate from the Transform menu.
- In the resulting dialog box, click By Polar Vector, and then click on the arc-tangent calculation displayed behind the dialog. In the Distance field, enter some reasonable distance such as 1 inch, 1 cm, or 100 pixels. Click OK.
The resulting point P' is the translation of P by your specified distance in the direction of the arc-tangent angle. Use the Line tool in the toolbox to draw a line between P and P'.
- Finally, select and hide the arc-tangent calculation and point P', both of which you created only to construct the line through P.
When complete, you will have a line that passes through P and that has a slope equal to the value of your differential equation at P.
Part II: Exploring the Rate of Change
Drag point P around in your sketch and observe the change in your line's slope. Then answer the following questions:
Q1. Where is P when your line is horizontal or closest to horizontal? Where is your line closest to vertical?
Q2. Explain your answer to the previous question algebraically in terms of your differential equation. Why is the line horizontal or near vertical in the cases you found in Q1?
Q3. Imagine you turned to your classmate's computer and found that when you dragged point P in that sketch, the line through P did not change slope. What statement(s) could you make about your classmate's differential equation?
Part III: Constructing the Local Slope
By definition, your line through P is infinitely long, and has the same slope at all points on the line. Unfortunately, solutions to your differential equation have that slope only directly at P—and not along the whole length of the line!
In this part, you'll replace your line with a short segment of the same slope centered at P. This short segment gives you a better representation of the slope as "local to" P.
Steps:
Step 1. Continuing in the same sketch, use the Segment tool to draw a segment about 1 cm long in the upper-right corner of your sketch.
Step 2. Choose Relabel Segment from the Display menu, and name the segment Delta.
Step 3. Using the Selection Arrow tool, select both Delta and your point P and choose Circle By Center + Radius from the Construct menu.
Sketchpad creates a circle centered at P with a radius equal in length to segment Delta. You can make this circle larger or smaller by changing the length of Delta.
Step 4. Construct the two points of intersection between this circle and the line through P. Then hide the line and the circle, and connect the two intersections with a segment (using either the Segment tool or the Construct menu). Hide the intersections, so only the original point P and the segment remain.
At this point, you've replaced your line through P with a collinear segment through P. The length of the segment is controlled by Delta—the radius of the circle of which the new segment is a diameter. Change the length of Delta and observe the effect on the segment through P. Drag P about the sketch to confirm that the segment changes slope just as your line did.
Part IV: Developing the Slope Field
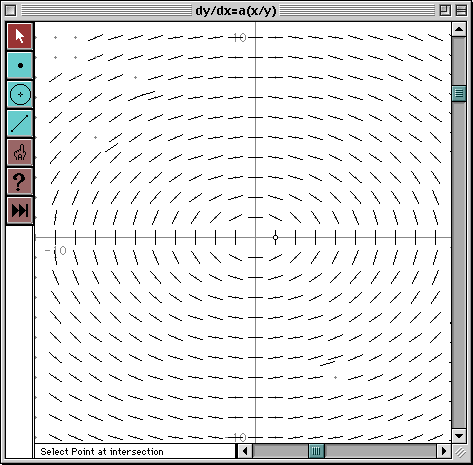
The segment at P shows you the slope at a single point. Dragging P shows the slope at every point of the drag. A slope field diagram describes the slope at many points simultaneously, giving a "big picture" of the shape of all solutions to the differential equation.
Step 1: Select the segment through P and choose Trace Segment from the Display menu.
Traced segments leave images behind as they're dragged. Using tracing here allows you to see the segment's shape at various positions of P simultaneously.
Step 2: In the Graph menu, choose Snap to Grid.
Snapping to Grid causes dragged points to stick to the "lattice grid" (integer coordinates) of your coordinate system. Using snapping here allows you to drag P to uniformly spaced positions in the plane.
Step 3: Drag P.
As you drag, the traced segment shows the slope local to each point on the lattice grid. Try to drag P so that you fill in the entire lattice.
If you find that your traced segment's images are overlapping each other, you may want to stop and make the segment shorter (by changing Delta's length), or make your lattice larger (by dragging the point at (1, 0) away from the origin).
Then resume dragging until you've filled in segments for the entire slope field.
 Part V: Investigating Slope Fields
Once you've diagrammed the slope field for your differential equation, print your sketch if you have access to a printer. (You may want to choose Print Preview from the File menu, first, and ask to Scale to Fit Page so that the printout fits one sheet of paper exactly.) On the printout or on the screen, identify patterns in your slope field. The slope field at left, for instance, contains patterns suggesting a series of nested ellipses.
When you're done with the questions below, don't forget to save your sketch so that you can continue exploring your own differential equation in the next section.
Q4. Describe the shape and location of the patterns that occur in the slope field of your differential equation.
Q5. On your printout (or on a separate sheet if you don't have a printout), use different colored pencils to trace out three different patterns or paths you find in your slope field.