Definite Integrals
Objective
Graphically, a definite integral is represented as the area under a curve. In this informal activity, you will explore several ways of approximating such an area. The methods you'll explore include a trapezoid sum and several rectangle sums.
Steps (Part 1):
Step 1: Open the sketch called Sum_Strt.gsp in the Integrat folder.
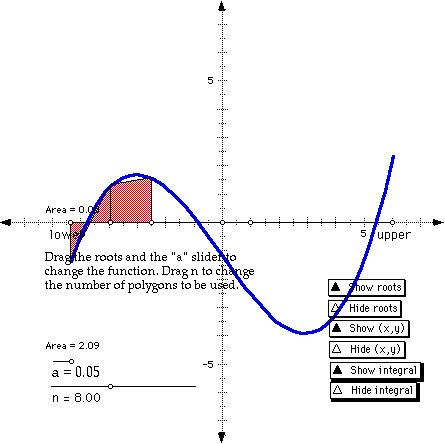
In this sketch you will use script tools to explore several approximating sums of a function. Each group in the class will investigate the same function and interval, but will divide the interval into a different number of polygons. Drag the slider for n to set the desired number of polygons for your group. (Be sure not to change the function by dragging the roots or the a slider at this time.)
If you like you can show sample x and y values and drag them, and you can show the actual integral. If you show either of these features, hide them again before beginning the next step.
Step 2: Set your script tool folder to the Integrat folder.
Choose Preferences from the Display menu, and then click the More button. In the Script Tool Folder portion of the dialog, click Clear (if it's enabled) and then click Set. Use the dialog that appears to select the Integrat folder. Click the Continue button in the Advanced Preferences dialog, and then click the OK button in the Preferences dialog.
A script tool icon should be present at the bottom of your toolbox.

Step 3: Click and hold on the script tool, and then choose the Trapezoid Sum tool. This tool will create trapezoids to approximate the area under the curve. Click the tool on the lower limit (the point labeled lower on the x-axis). A trapezoid and its area measurement appear.
Click the tool again, this time on the new point on the x-axis (the point at the right edge of the first trapezoid). A new trapezoid appears. Continue clicking to create the trapezoids needed to approximate the area. The total number of clicks should match the value of the n slider.
You may note that the area measurements are directed, in the sense that areas below the x-axis are considered negative, while those above are positive.
When you're finished creating trapezoids, click on the selection arrow tool to stop using the trapezoid tool.
Step 4: Your sketch should show n area measurements, though they may be in different places in the sketch and some of them may overlap. Drag these measurements so they are arranged in a more organized way and so they don't overlap. Then use the calculator to find the sum.
Q1. Write your results here: n = ________ sum = _________
Share your results with the rest of the class, and graph the result for the integral as a function of the number of polygons.
Step 5: When you're finished calculating the sum, double-click the "Show Integral" button to display both the exact region under the curve and its exact integral.
Q2. How does the trapezoid sum compare with the exact result?
Step 6: Use the calculator to calculate the percent error in your trapezoid sum, compared to the exact integral.
Q3. Write your result here: error = ___________ %
Step 7: You can modify the function by dragging its roots or by dragging the a slider, and observe how the trapezoid sum and the exact definite integral vary for different functions. You can also change the value of n, but if you do so you will have to add or remove trapezoids and recalculate the sum.
Step 8: Open the sketch called Integrat.gsp.
This sketch shows the trapezoid sum for different divisions of the interval over which the area is being approximated. When it opens, the number of divisions will automatically be animated between 1 and 20. The red bar on the right indicates the error resulting from this approximation; it is proportional to the percentage difference between the approximate result and the exact result.
After you stop the animation, you can change n (the number of divisions), and you can also change the coefficients a, b, c, and d, which determine the function being graphed.
Steps (Part 2):
Several particular rectangle sums are important in developing the Fundamental Theorem of Calculus, particularly the Upper and Lower Riemann sums.
Step 9: Close your trapezoid sketch, and open Sum_Strt.gsp again. This time select the Upper Riemann sum tool. Use this tool in the same way you used the Trapezoid tool above.
Q4. How does this tool determine the height of each rectangle used?
Step 10: Compare the upper Riemann sum with the exact definite integral as you manipulate the function by dragging the roots and the a slider. Try to manipulate the function in such a way that the approximation is less than the exact integral.
Q5. Is there any way to do this?
Step 11: Close your Upper Riemann sketch, and open Sum_Strt.gsp again. This time select the Lower Riemann sum tool. Use this tool in the same way you used the Trapezoid tool above.
Q6. How does this tool determine the height of each rectangle used?
Step 12: Compare the lower Riemann sum with the exact definite integral as you manipulate the function by dragging the roots and the a slider. Try to manipulate the function in such a way that the approximation is greater than the exact integral.
Q7. Is there any way to do this?
Explore More:
Try the Midpoint Riemann tool. How does it compare with the other two Riemann tools? How does this tool determine the height of each rectangle used?